A Painter’s Guide to Big Sur
I find great inspiration in the wild and rugged California Coastline of Big Sur - all original oil paintings painted on location, or in the studio in San Diego.
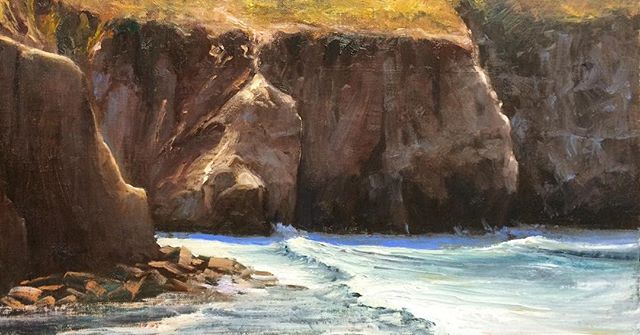
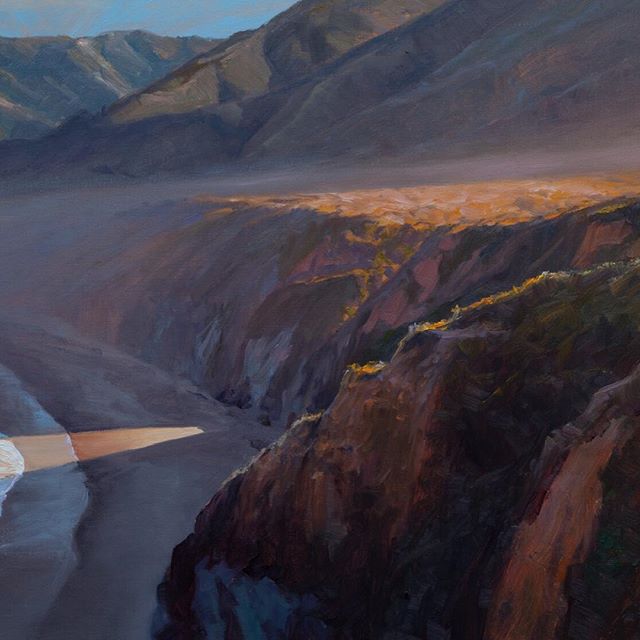
I find great inspiration in the wild and rugged California coastline of Big Sur. I've painted it for years, all original oil paintings, on location when I can, or in the studio in San Diego. I've stood at an easel in most of the places below, in the fog and the wind and the cold, waiting for the light to turn.
This is the guide I'd give a friend who wanted to see it the way I have, not a checklist, but the stretch of coast I know best, and how to spend real time in it. Big Sur runs roughly from Cambria in the south to Carmel-by-the-Sea in the north: about ninety miles of Highway 1 with the Santa Lucia mountains on one side and the Pacific on the other. Both ends have places to stay, which makes them the natural bookends. Base yourself in Cambria or Carmel, and drive into the wild middle.
Slow down: pull over, get out, wait for the fog to move, let the light change. If you drive it straight through in a day, you'll see it. If you give it two or three days, you'll feel it. Start early, the light is best in the morning and the pullouts are empty. And if you can, stay a night. The dark out here is real, and the stars are worth the trip on their own.

Pavel Gazur painting in Kirk Creek, Big Sur | Painter of Big Sur - California Seascape Original Paintings
Before you go - Road Status
As of early 2026, Highway 1 is fully open again from Carmel to Cambria for the first time in nearly three years, the last slide repair reopened in January. That said, this coast slides and storms, and short closures still happen after heavy rain. Always check current conditions before you drive: Caltrans QuickMap and the Big Sur Highway 1 conditions page.
⚠ Read this before you go
"Some" drivers are looking ... everywhere but the road or cross the lane to park to the sea side of the road to enjoy Big Sur. Keep an eye on them and slow down around sharp turns just in case someone just decided to cross the lane on purpose, or by not paying attention.
Stay back from cliff and bluff edges. The ground along these bluffs is loose and undercut, it gives way without warning. Don't step past railings or worn edges for a photo. No view is worth it.
Never turn your back on the ocean. Sneaker waves and rogue waves come without warning and have pulled people off rocks and beaches. Watch the water, keep your distance from the surf line, and never let children near the water's edge unwatched.
The road has no shoulder in places. Highway 1 is narrow and winding with sheer drops. Pull fully into a marked turnout to look, never stop in the lane, and take the curves slowly. There are bicyclist on the road that can pop in front of you anytime.
Come prepared for remote country. Cell service mostly disappears. Gas stations are few and pricey, fill up before you go in. The weather turns fast and cold on the bluffs even in summer, so bring a warm, windproof layer.
If you have a convertible car. You may want to consider keeping the top closed, I know, the whole purpose of convertible is to enjoy the Big Sur with an open air. Here is the deal - I hear clicks on the top of my car occasionally driving through Big Sur. Yes, some of the rocks get loose and keep falling, specially after the rain. This is not throughout the Big Sur, only few sections, but still something for you to consider.
Carry a first-aid kit. I keep one in the car and a few items in my pack whenever I hike to a remote spot. Help can be a long way off out here.
Poison Oak. Take note that Big Sur has a lots of poison oak, get familiar with the plant, and be sure to bring itchy cream for poison ivy just in case.
Ticks. If you are planning to hike, wear full clothing (cover your shoulders and feet), when ticks are in season they are all over the place. You wouldn’t believe how many times I saw hikers in flip-flops and shorts walking through fields that I knew were full of ticks and poison ivy ... I don't think they read this guide :-)
Much of this I learned the hard way, painting on location for years, more of it is in my plein-air setup post, if you want a painter's version of packing for this coast.
Waves
Waves are huge with empty lineups. Big Sur waves are not the most friendly and safe waves to surf, but when they are on - they are incredible waves, with unforgettable scenery. Watching sunset from a surfer's point of view, immersed in the water, is an experience itself - it's like someone threw a bucket of paint at the sky, water and mountain. I surfed here many times - make sure you check the tides, some places are difficult to get back in during high tide.
How to get there
Coming from South: Best route is Highway 5 -> 46 over Lost Hills -> 41 -> Pacific Highway, or you can take Highway 101 -> 1 but either way you will end up in Cambria.
Cambria
Is a charming town with antiques shops, restaurants, definitely stop by and enjoy Linn's Restaurant - their pies and food are great. We stock up on food for camping at Cookie Crock Market.
Gas prices are high, but you don't have much alternatives - you are in Big Sur, gas up in this town as there are only 2 gas stations along the road and prices are higher.
If you want to stay the night, best hotels are along the Moonstone Beach Drive, prices are higher but the experience you get from sleeping this close to the beach is worth every penny.
A bonus - beautiful, well maintained path along the beach with plenty of access to the beach and spots for plein-air paintings.
San Simeon State Park
If you are going camping and want to stay longer around Cambria, this park has it all, well maintained with access to the beach. They have plenty spaces, but book ahead during the holidays.
Short walk under the bridge and you are ready to enjoy the beach and paint.
Ragged Point
Walk around and take few shots it has one of the most beautiful views. Hotel has amazing views. The burgers are awesome. The place has a gas station.
Place is inspiring for paintings from up above.
Plasket Creek
This park has surfing, hiking, fishing, and swimming – and of course perfect for plein-air artists – just walk down to Sand Dollar Beach. Campground is across a street if this is an option for you, note that spaces are limited.
Kirk Creek and Limekiln Parks
The bluff at Kirk Creek is where my book opens and closes — a campground right on the edge of the cliff, the Pacific breathing below. If you want one night in Big Sur, make it here: reserve a spot, and stay for the stars. There's no water or showers, so pack your own water in.
Limekiln Park is 10 minutes away and offer access to the beach, both parks are well run, but spots are limited, especially in Limekiln. Limekiln has a warm shower if that’s something you must have. The place offers some beautiful hikes.
Sites book far ahead — reserve through Recreation.gov.
Partington Cove Trail
This hike is worth it, it’s only a mile long hike through the canyon with beautiful scenic views. Pull up 2 miles north of Julia Pfeiffer Burns State park - it has a long sweeping bend where you park and than you have to go through a gate. As you start the hike on the main path, take a left through a little bridge - you will not miss it, than go through the 60 foot tunnel and you end up at one of the most beautiful coves in Big Sur. On the way back after you exit from the tunnel and you get back to main trail take a left and you end up at another beautiful beach. Coordinates: 36.1770, -121.6937 (36° 10′ 37.2″N 121° 41′ 37.3″W)
Pfeiffer Beach
The moment you pull out of the bakery, in Big Sur continue driving north for about 2 minutes, slow down you are going to take a first left, to a very steep downhill road on an unmarked road leading you to Pfeiffer Beach – talking about a most beautiful beach in the world. There is no sign except “Narrow Road,. No RVs - Trailers”. If you are unsure, set your odometer if you are going South, it’s 1.1 miles from the Julia Pfeiffer Burns State Park, or 1.8 miles north of Nepenthe Restaurant. You will drive for about 2.5 miles. This is the place many photographers in winter fight (literally) for taking a perfect shot, when sun peeking through the rock opening lights up the opening. There is an entry fee, and note that you can’t get there with a big RV. Best time to go is for the sunset. In winter bring a warm jacket, it can get pretty cold when it’s windy. Coordinates: 36.240215, -121.777226 (36° 14′ 24.77″N 121° 46′ 38.01″W)
Nepenthe
Central Big Sur · restaurant, café, and the Phoenix Shop · open daily
If there's one gathering place on this coast, it's Nepenthe, a restaurant perched 800 feet above the Pacific that's been serving travelers, artists, and wanderers since 1949. It's still run by the same family that built it. Sitting on the terrace with the whole coast falling away below you is one of those Big Sur experiences worth stopping for, even if you only order a coffee.
There are really three parts to it. Nepenthe itself is the restaurant up top, open daily for lunch and dinner, no reservations, it's a walk-in wait list, and there's usually a wait, so come off-peak if you can. Café Kevah, on the terrace just below, is the more relaxed spot, breakfast and lunch, counter service, weather permitting (it closes when the fog and wind win). And the Phoenix Shop below that is worth a look for anyone who loves art and craft: books, jewelry, and work from local artisans, in a redwood-beamed room with the coast in the windows.
For a painter, it's the natural place to warm up, watch the light on the water, and let the crowd remind you that people have been coming to this coast for the same reasons for seventy-five years.
Hours and wait-list details change with the season — check nepenthebigsur.com before you go.
Big Sur Village
Central Big Sur, in the river valley · lodging, food, gas
When people say "Big Sur," they sometimes mean the whole ninety-mile coast, and sometimes they mean this: the small cluster of inns, restaurants, and a couple of gas stations strung along the Big Sur River valley, under the redwoods, roughly in the middle of the coast. It isn't a town in the usual sense. There's no main street, no stoplight. Blink and you've driven through it. But it's the closest thing this coast has to a center, and it's where you'll find most of the food, fuel, and beds between Carmel and the south end.
A practical note, because it matters out here: the Big Sur Bakery, a community landmark since the 1940s, was destroyed by fire in May 2024, and its future is uncertain. The gas station on that same property (the Big Sur Shell) survived and is still one of the few places to fuel up on this stretch, but don't count on the bakery being there. Gas is scarce and pricey along the whole coast, so fill up whenever you can.
Point Sur & the Lighthouse
19 miles south of Carmel · tour-only, first come first served
A lighthouse on a 361-foot volcanic rock, and the heart of my book, the water off this point is where the USS Macon went down in 1935. It's open only by docent-led tour: about three hours, a steep climb, no reservations. Tours run Saturday, Sunday, and Wednesday; you meet at the farm gate on the west side of Highway 1. Arrive 30 minutes early — they fill up, and the walk is strenuous, so dress in layers for wind.
Tour times shift by season and weather — confirm at pointsur.org before you go.
See the story behind the book “The Light at Point Sur” →
Garrapata State Beach
A wide pale beach below green bluffs, reached by unmarked turnouts along the highway — easy to drive right past. This one is personal for me: my wife Siobhan and I were married here, and it's a central place in the book. Come for the sunset and the walk down, and watch your footing on the bluff trails, the edges are loose. There are no signs to stop, however if you are driving south, it’s 2.3 miles from Soberanes Point. There is plenty of parking along the road. Download this map to your mobile phone, or print it before your trip.
The day we married at Garrapata
Soberanes Point
The point has beautiful hikes with great views. Watch out for poison ivy! There are number of trails where you can hike, stop take pictures, or paint. Download this map to your mobile phone before your trip.
Point Lobos State Park
Drive all the way to the last parking lot - and go on a hike to China Cove it has the most amazing sunsets. Picture perfect - you will find endless inspirations for your plein-air works.
Carmel by the Sea
The northern doorway to Big Sur, and a good base if you want a bed, a meal, and a gallery walk at the end of a day on the coast. From here it's a short drive south to where the wild coast begins.
Book: The Light at Point Sur
Years later, that same coast became the heart of my first novella, The Light at Point Sur, a love story set on these beaches and the 1935 USS Macon disaster off Point Sur.
Where to eat and stay
There isn't much between Carmel and the south end, so what's here matters. These are the places I'd point a friend to, a few good, longstanding spots rather than a full listing. Big Sur lodging books up well ahead, especially in summer and on weekends, so reserve early.
Big Sur River Inn — Right in the heart of the valley, on the Big Sur River. Riverside and ridge rooms, a restaurant and full bar with decks over the water, a general store with a burrito bar, and an ice cream bus on the lawn. There's also a gas station and store here. A good, unfussy base.
Deetjen's Big Sur Inn — A historic inn under the redwoods in Castro Canyon, built in the 1930s and on the National Register. Rustic single-wall cabins, wood stoves in some rooms, and no TVs, phones, cell service, or WiFi — that's the point. The restaurant is a Big Sur institution: breakfast every morning (their eggs benedict has won "best breakfast" in the county), dinner Friday through Tuesday. Reserve for dinner, and note there's no dinner Wednesday or Thursday.
Nepenthe & Café Kevah — The gathering place, covered above. Worth it for a meal or just a coffee on the terrace 800 feet above the water.
For a splurge — Big Sur also has two of California's best-known luxury retreats, Post Ranch Inn and Ventana, both perched on the cliffs, and the Esalen Institute, the historic hot-springs and workshop retreat. Different world, different price, but they're part of what Big Sur is.
Camping — If you'd rather sleep outside, this coast is made for it. Kirk Creek (above) is the clifftop favorite; Pfeiffer Big Sur State Park and the private campgrounds in the valley put you under the redwoods along the river. Reserve ahead through Recreation.gov or the campground directly.
Hours, closures, and openings shift constantly on this coast — always confirm directly before you rely on any of it.
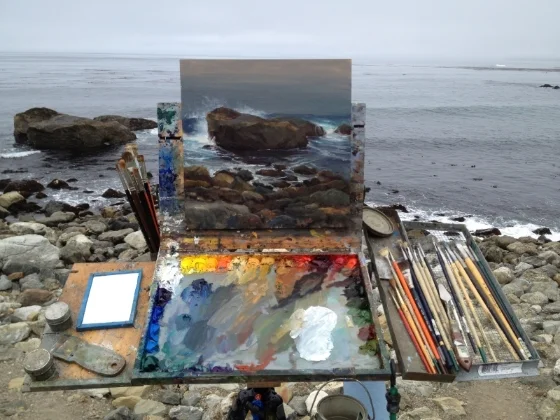
Plein-Air Setup | California Seascape Painter of Big Sur
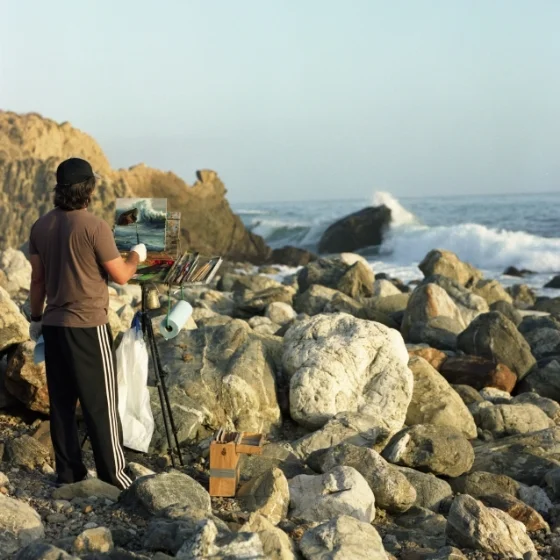
The key to on location painting is to go light, and bring only essentials. Here is my basic packing list for plein-air paintings along the California Coastline.
The key to on location painting is to go light, and bring only essentials.
How do you know if you are packing too much?
If you are ready to head out to paint plein-air and you get this thought "I don't feel like packing and dragging all this stuff with me" .... it's time to re-think your strategy.
I spend 80% of my time painting outside, so for me it was essential that I get this part right, and besides I did not want any bad thoughts to enter my mind - they can influence my paintings.
It took me few years to get this right.
I wish I could have painted that!
I didn't ever want to just "wish I could have painted that", so I keep my setup "always" in the car, ready to go.
This saves me time of loading and unloading the car, but mostly it enables me for spontaneous plein-air paintings. You are driving and see a beautiful seascape / landscape and you get that second look ... you know that look .... you just have to paint it.
I set everything up by my car
Just like you see on the picture, I carry the whole setup in one hand and the wet panel carrier in the other hand to the location.
When I get to my location I put down the easel, I am ready to paint.
After I finish, I clean up everything thoroughly on-location: brushes, mixing area - to have it ready for the next painting. The only thing I leave in the mixing area are the colors.
NOTE: The carrying of the setup in one hand may not work for everyone, because the tripod is quite heavy. You have two alternatives - pack everything in a backpack or get a carbon-fiber tripod (more expensive) with a sandbag to hold it down during windy conditions.
Before I paint I examine each color if it is fresh
Simply tap on the paint with your pallet knife and if it feels hard to the surface, carefully peel off the top surface of each paint. If it is too hard - most likely the paint is dried up and it's time to re-fresh. If you paint outside everyday this is not a problem
Get to know your paints, some dry up faster than others - for example my Vasari paint - "Bright Red" - stays fresh for week, where as my Winsor Newton - "Burnt Umber" drys up in 2 days.
I prefer "long" paint - I premix all my oil paint before I begin painting with turpentine in order for the paint to flow and to be "long". How do you know if it's long? If you lift the paint with your palette and it's ready to fall off without it being runny than you know it's "Long".
I pre-mix all my local colors before I begin painting.
What I carry with me:
Easel, linen-covered-panels, paints, brushes, liquin, can of odorless turpentine, razor-blade, paper towel, waste bag, box for transporting finished work, gloves, sun hat, good warm wind-proof jacket, pliers.
be ready for unexpected- have backup
Double up on these items:
White paint - few times I just simply run out, so I keep one extra in my car.
Turpentine - you want extra - few times the wind knocked my easel over, while I was stepping back to examine my painting, having backup in the car now solves this problem.
Paper towel, waste bag, gloves - just a good idea to have extra.
When painting the sea, sometimes you get too close to water, add to it high rising tide and most likely your shoes, pants, socks get wet - now I always have backup.
Bring water - keeps you hydrated while painting.
Pliers - the tripod can get stubborn from the sand, or some paint may need an extra help. Pack one.
plein-air EASEL- for paintings under 20"
For paintings under 20" - I recommend a light weight pochade box. Before choosing your favorite do ask about weight of the easel. I use 11x14 pochade box from www.openboxm.com - great quality, and lasting easel.
I made one modification to it, I painted the bottom mid-value-5 "gray" and covered it with 1/8" glass. If you go thinner even a light bend to the setup may crack the glass, if you go heavier the easel becomes too heavy.
The glass will enable you to clean up the mixing area with razor-blade when you are finished.
The mid-gray-value helps me relate colors easily (lighter and darker) when mixing (my panels are pre-stained with burnt umber about medium value).
An alternative to openboxm is easel from www.artworkessentials.com it comes down to your preference.
Either easel you choose, you will need to also purchase Manfrotto MT190XPRO3 Tripod with 496RC2 Ballhead - it is pretty sturdy, and weighs more than I prefer but the extra weight also makes the easel more sturdy. An alternative is carbon fiber easel but than you definitely need a sandbag.
Get a sandbag for windy conditions. I just throw a rock in mine. An alternative is to get a bungee and tie the wet panel carrier to the easel as a weight.
Maintain your easel and tripod. Make sure you clean off the tripod with water so it doesn't rust if it was splashed by water. Get the sand out so the legs move up and down easily. Spray moving parts with WD-40 than wipe it off.
For paintings over 20
I use Beauport Large Format easel http://www.jerrysartarama.com/beauport-large-format-outdoor-easel - great easel, and relatively easy to setup and you can go big.
GATORFOAM PANELS / boards:
I purchase only linen covered gatorfoam panels - they are extremely light weight, and they can be easily restored 100 years from now (but that's another article about using archiving materials).
Buy them from "New Traditions Art Panels, Inc" http://www.newtraditionsartpanels.com . They are not cheap, but this is one place where I would never save.
I am fanatic about the surface, it just has to be right. You will have to test what you like, in my case I like only L280 (medium weave), L600 (really nice and smooth grade) - both linens are double oil primed.
I also like 359 this is alkyd primed medium - I use a different technique when I paint on this canvas because I can create a really nice effect - tough to describe - it can be only seen when viewing paintings live (you can't see the effect on the photo).
WET PANEL CARRIER:
I buy EZ Port from http://www.artworkessentials.com/products/ezport/index.htm - I try to keep it simple, by bringing only same size panels.
Half of my box is 12x16, the other half is mixture of 16x8 or 16x9 - it is extremely easy to manage the paintings because they are all the same width 16.
Immediately after I finished painting, I place wet painting board in the box, keeps the smell away from the car.
I made a minor modification on the box - added a foam to the inside top. When I close the box I wanted to make sure the boards don't move. (I'll post a picture in the future for reference.).
COLORS:
All are Windsor Newton Oil Colors, but exceptions are noted. I like to use rich Pthalo (or Winsor by Winsor Newton) colors.
Lot of my colors are transparent they are critical (at least in my case) to paint the sea.
I started off my plein-air paintings only with four colors, they are marked with * below.
Painting with four colors will turn into a paint mixing machine over time and they pretty much assure color harmony in your paintings.
I experimented over the years with hundreds of colors and I am sure my palette will change again soon so check back.
Some colors below are inter-changeable except Titanium White. I only use white from Vasari, it has just the right flow, it's pure Titanium - it's the best white ever.
If you use alternative maker for the colors make sure you examine what oils (or additives) they used in the paint, as it will greatly influence how the paint behaves on your canvas.
Why so many? I like to be effective and not waste a lot of my time mixing colors, specially when I am on location, makes it very easy to paint. If you are just starting out, I would recommend to start with four colors marked with *below.
I buy paintings from dickblick.com - prices are competitive and they have large selection, Vasari paints can only be purchased from Vasari directly - their packing is unbelievable - I re-use their boxes when I travel oversea.
- Carribian blue hue PB15/1 - Charvin - just a nice color for sea paintings.
- Winsor blue red shale
- *Ultramarine blue - Vasari Oil Colors
- Cobalt blue
- Cerulean blue - I tested many cerulean colors and Winsor Newton in my opinion is the best for my paintings. You will find it a little grainy, and a little hard. I pre-mix it for it to flow and I don't mind the grainy effect.
- Winsor violet
- Pthalo turquoise
- Permanent green deep
- Viridian
- Pthalo green
- Alizarin Chrimson - Gamblin or Vasari or you can use Permanent Alizarin Chrimson from WN
- Transparent Oxide Red - Rembrandt
- Raw umber green shade
- Burned umber
- Burnt Siena
- Winsor Red deep (I love this color)
- *Bright Red - Vasari
- Winsor orange - sometimes I use Cadmium Orange from Michael Harding - very clean
- Indian yellow
- Raw sienna - Vasari (I use this occasionally)
- Yellow Ochre pale - or Yellow Ochre from Vasari - both have the same value.
- Cadmium Yellow Deep
- Cadmium Yellow Pale
- Hansa yellow Intense Transparent (PY3) - Graham
- *Cadmium Yellow Lemon from Vasari
- *Titanium White - Vasari ONLY - I tried many whites, nothing comes close. I bring with me always two tubes.
BRUSHES:
By http://www.rosemaryandco.com/ - they make great brushes at fair prices.
I use "classic long flat" (4, 6, 8 sizes) brushes.
I like Signet brushes but I modify them - they feel a little bulky to me so I cut off with a razor portion on both sides.
I almost never use round brushes until the very end of the painting when I use few "rigger brushes".
For some ocean effects "fan brushes" are perfect choice.
PALETTE KNIFE:
To mix paint I use palette knife, it's great to premix local colors.
I only use palette knife occasionally to paint, it does give a perfect edge - so when it's needed I use it.
PAINT THINNER:
MEDIUM:
I use "Original Liquin" from Winsor Newton, or
5-1-1 mix 5 Parts of Turpentine, 1 Part Stand Oil, 1 Part Damar Warnish.
Note that you need to use Winsor & Newton Distilled Turpentine to mix the 5-1-1.
CANISTER:
Holbein Metal Brush Wash Medium - 16 Oz ONLY. No other canister will last, it's pricey, but will not leak and last many years. An exceptional canister.
GLOVES:
Kirkland Signature™ Nitrile Exam Gloves 400ct (in my case Large) - they are great. I like to paint with gloves - when I am done I like to just take them off and go (without spending another 5-10 minutes cleaning my hands). These gloves are tight and if you need to use your finger to adjust an edge it will work just like without gloves. (In the studio when I am done I dry them and re-use them.)
RAZOR:
Razor blades from Home Depot, I buy a big batch for a whole year.
PAPER TOWEL:
Scott Shop Towels Original either from Costco or Amazon. I prefer these towels because they will not have loose "hair" as the white paper towels.
WASTE BAG:
For used paper towels, or any waste, use any kitchen bag.
PLIERS:
Bring pliers - it will be handy when the paint tubes get stuck, or the screws on the easel get stuck. (from time to time I spray wd-40 on all screws on easel)
SUN HAT:
If you are painting on the beach - this is essential.
UMBRELLA:
This is optional. If you are a beginner and can't adjust your colors on the canvas for bright light, this is essential. At minimum keep your painting and colors against the sun so both are in the shadow, or just paint when it's overcast.
JACKET:
Essential to paint on the beach for those cold windy mornings in Northern California.
MIRROR:
BLACK on one side/REGULAR on the other size are necessary to re-confirm your values or colors - this is the best tool to critique your painting and it never lies.
SPORTSMOBILE
For plein-air painting I found sportsomobile.com making the perfect car for me and my family, I highly recommend these cars for artists, photographers.
FIRST AID KIT
I always keep first aid kit in the car, and pack few items in the backpack, just in case. When hiking to a remote destination one item is always with me - a poison extractor. Just in case of any snake or any other bites that can be life threatening can save you few hours to get proper care.
If you want to get more depth overview on the setup, feel free to contact me, and note that nobody paid me to recommend any of these products.
I also teach plein-air painting techniques workshops along the California Coastline, contact me if you would like to be added for the next class or if you need private class (plein-air or studio) to solve specific problems in your artwork - we get do it online or one-one.